Quickstart
This guide walks you through the basic Revenipe setup. You will create an app, connect Stripe, configure your first product, attach entitlements, and use the Flutter SDK to check customer access from your app.
Before you start
Before starting, make sure you have:
a Revenipe account
a Stripe account
a Flutter app
access to the Revenipe dashboard
Step 1: Create your app
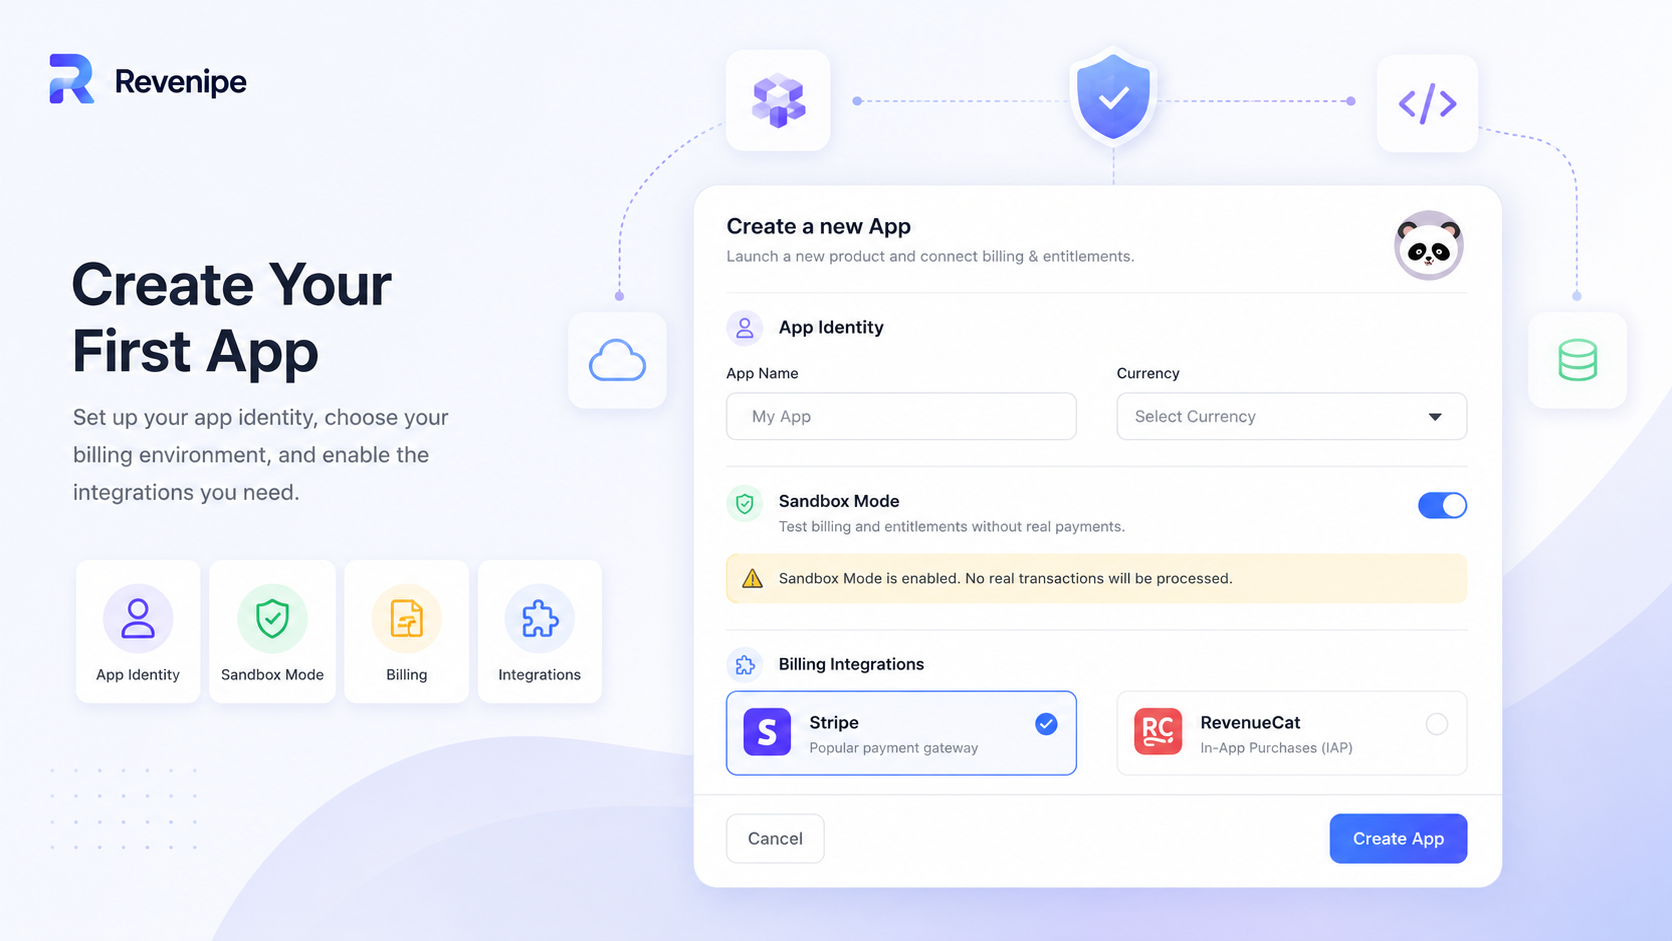
Create a new app in the Revenipe dashboard.
An app represents one project that uses Revenipe for billing, products, customers, and entitlement management.
Step 2: Connect Stripe
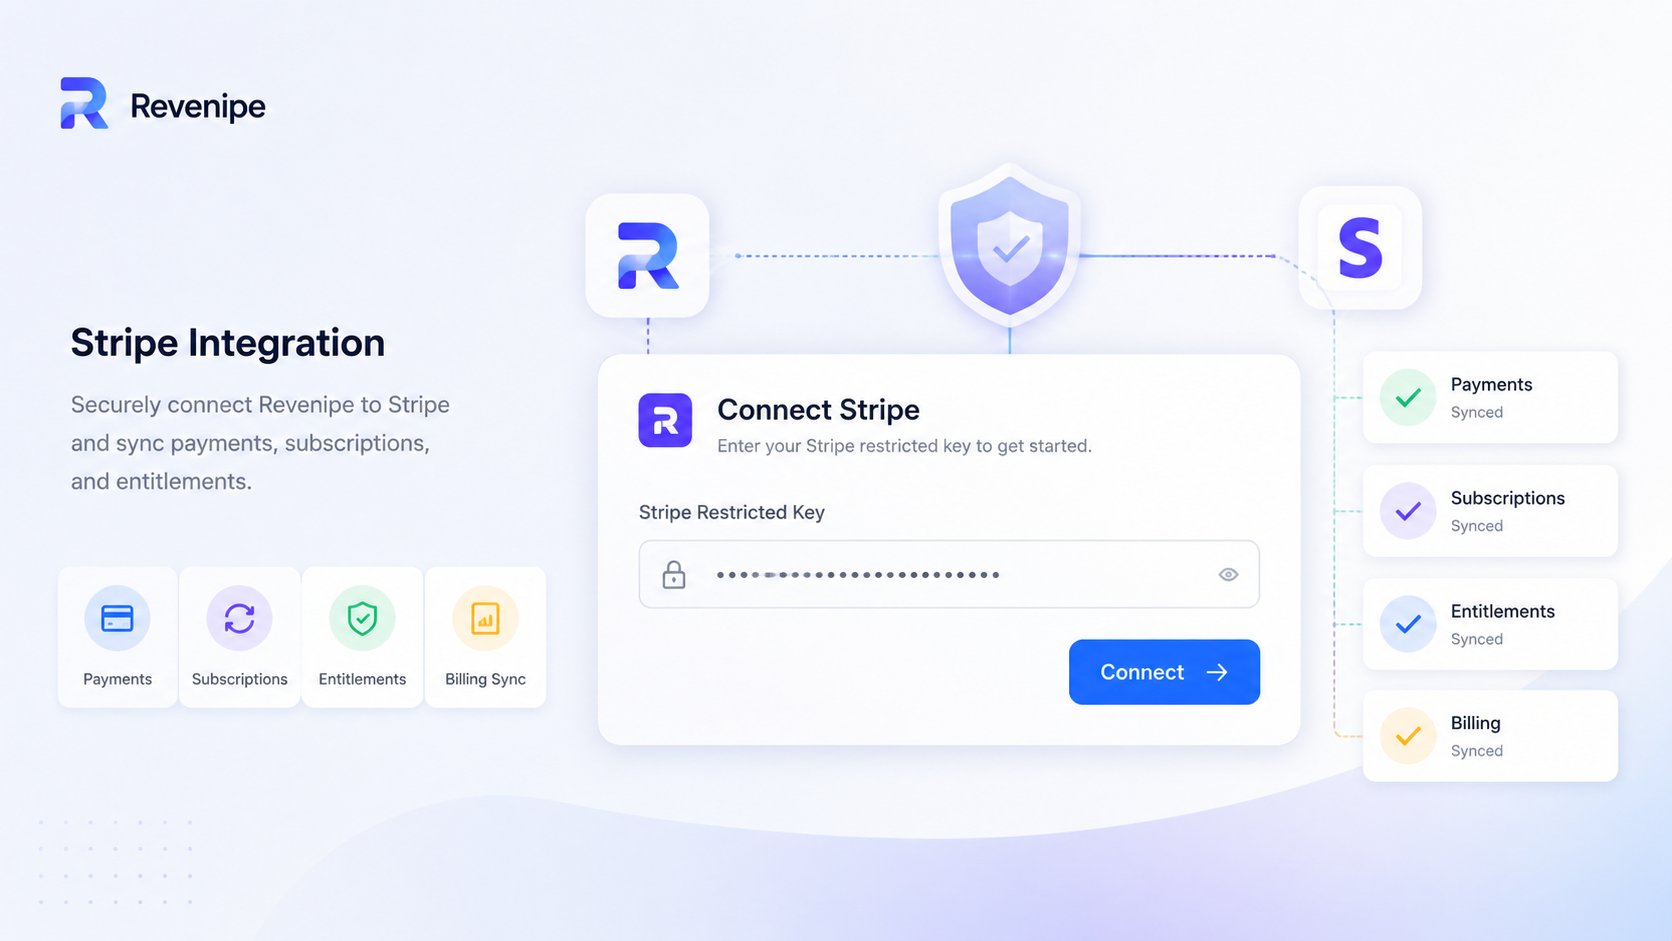
Connect your Stripe account from the dashboard.
Stripe handles payments and billing events. Revenipe listens to those events and turns them into customer access, subscriptions, add-ons, and entitlements your app can use.
Read this article to learn how to connect your Stripe account to your Revenipe app.
Step 3: Create a product
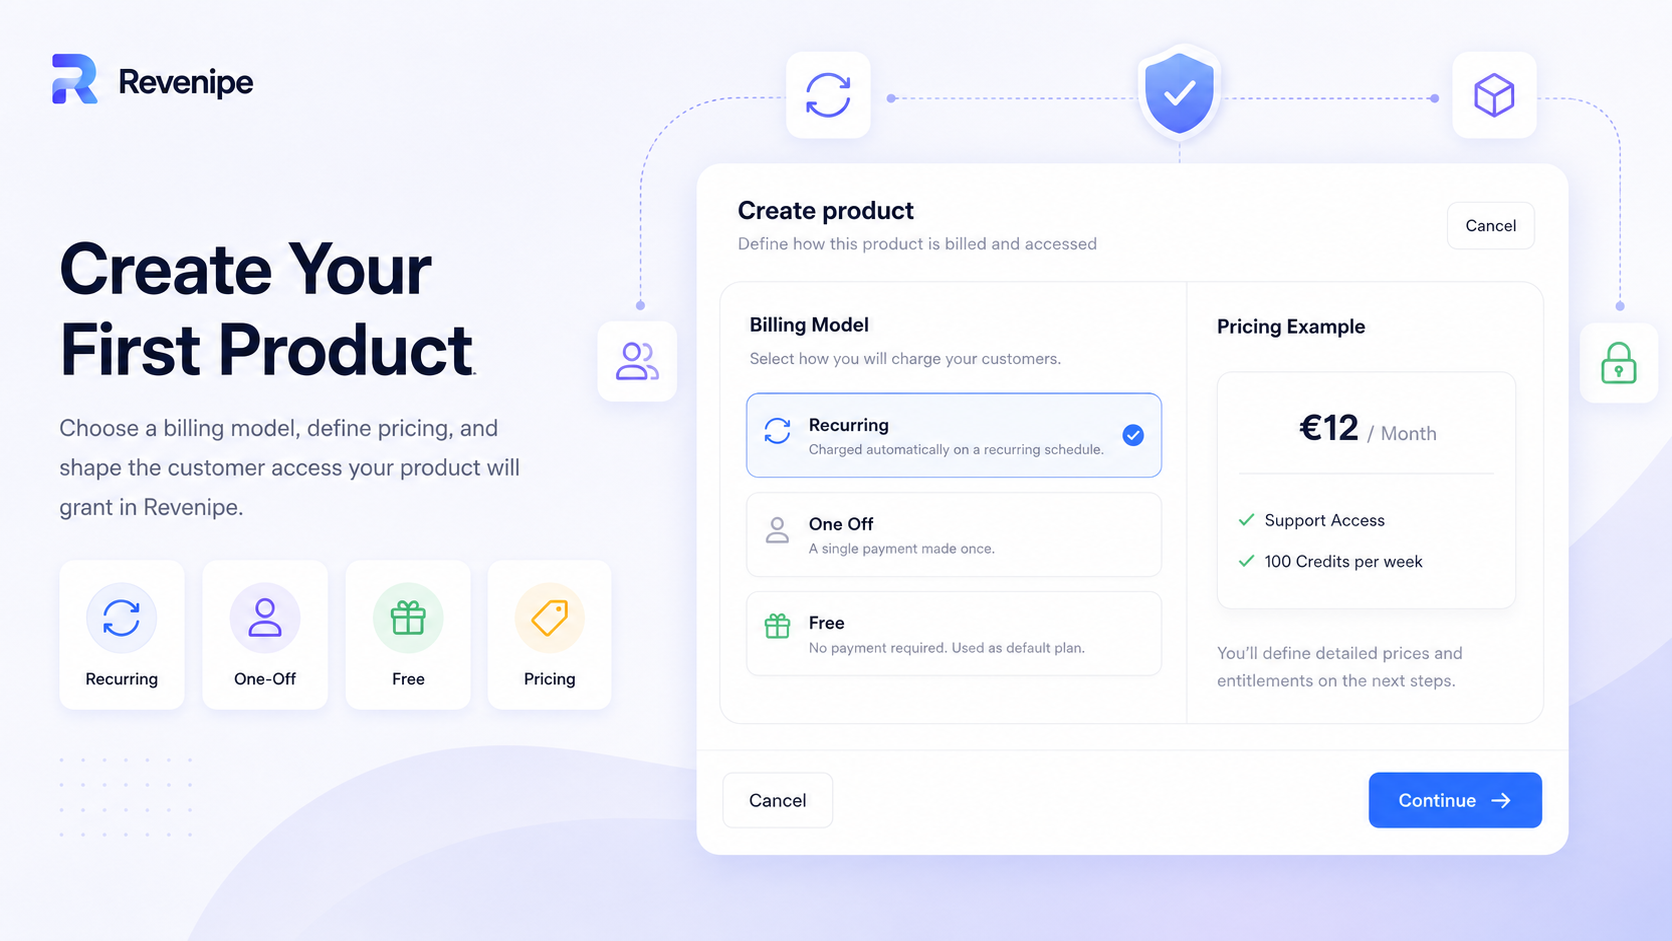
Create your first product in Revenipe.
A product defines what a customer can buy or receive. During product creation, choose a billing model:
Recurring: for subscriptions and recurring access
One Off: for single purchases, lifetime access, or credit packs
Free: for products that do not require payment
After choosing the billing model, continue to the product details step.
Step 4: Add product details
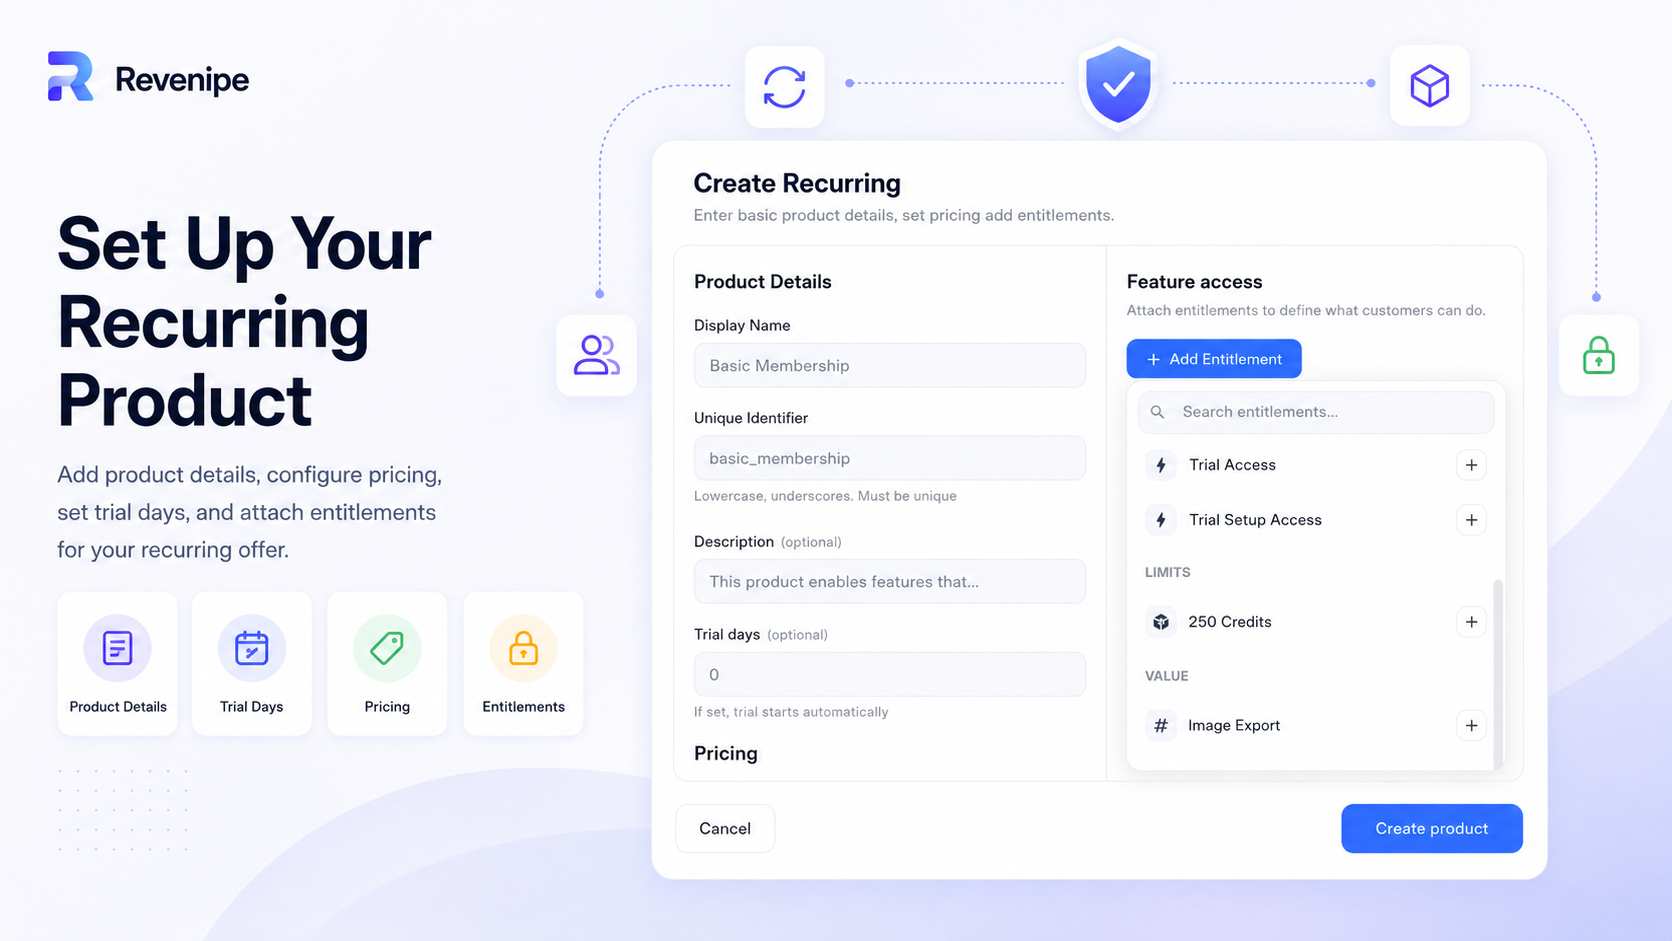
Enter the basic product details.
Display Name: the public name of the product
Unique Identifier: the stable product ID used by your app and SDK
Description: optional internal or customer-facing context
Trial days: optional trial length for recurring products
Use stable identifiers. Your app may reference product IDs when starting purchases or matching products in the SDK.
Step 5: Attach entitlements
Attach one or more entitlements to define what customers receive when they get this product.
Entitlements are the access layer of Revenipe. They are what your app checks after a customer purchases, starts a trial, receives a free plan, or gets an add-on.
Use flag entitlements to unlock features
Use limited values for fixed credits or one-time top-ups
Use value entitlements for renewable limits
For example, a recurring product could grant support access and 100 credits per week.
Step 6: Install the Flutter SDK
Add the Revenipe Flutter SDK to your Flutter project.
flutter pub add revenipe_flutterUse the installation method shown in the Flutter SDK install guide.
Step 7: Configure Revenipe
Configure the SDK with your Revenipe app key.
Examplefinal revenipe = Revenipe.instance;
await revenipe.configure(
config: const RevenipeConfig(
appId: 'app_your_public_app_id',
),
);Step 8: Login a customer
Login a customer before fetching products, starting purchases, or checking access.
Exampleawait Revenipe.instance.login('customer_123');Use your own stable customer ID. Revenipe uses this ID to attach subscriptions, purchases, trials, add-ons, and entitlements to the correct customer.
Step 9: Fetch products
Fetch the products configured in your Revenipe dashboard.
Examplefinal products = await Revenipe.instance.getProducts();Only products that are active and available for the current environment should appear in the SDK response.
Step 10: Start a purchase
Start or prepare a purchase flow for the selected product.
For Stripe Checkout, Revenipe returns a Checkout URL that you can open in the browser.
For Stripe Payment Sheet, Revenipe returns the required payment data, such as the client secret. Your app then uses flutter_stripe to present and confirm the native payment sheet.
For RevenueCat products, the purchase is handled by the RevenueCat SDK. After the purchase is completed, refresh the Revenipe customer state so your app can read the updated access and entitlement data.
Examplefinal response = await revenipe.startPurchase(
options: MakePurchaseOptions(
customerId: customer.customerId,
productId: 'pro_monthly',
method: RevenipePurchaseMethod.hostedCheckout,
successUrl: 'myapp://billing/success',
cancelUrl: 'myapp://billing/cancel',
),
);
final checkoutUrl = response.checkout!.checkoutUrl;The response depends on the product and provider configuration.
Stripe Checkout
For Stripe Checkout products, Revenipe returns a Checkout URL.
Open this URL in your app or browser and refresh the customer state after the customer completes the checkout.
Exampleif (result.checkoutUrl != null) {
// Open the Checkout URL with your preferred browser or url_launcher flow.
}Stripe Payment Sheet
For Stripe Payment Sheet products, Revenipe returns the required payment data.
Examplefinal response = await revenipe.startPurchase(
options: MakePurchaseOptions(
customerId: customer.customerId,
productId: 'pro_monthly',
method: RevenipePurchaseMethod.paymentSheet,
),
);
final paymentSheet = response.paymentSheet!;
await Stripe.instance.initPaymentSheet(
paymentSheetParameters: SetupPaymentSheetParameters(
merchantDisplayName: 'My App',
customerId: paymentSheet.customerId,
customerEphemeralKeySecret:
paymentSheet.customerEphemeralKeySecret,
paymentIntentClientSecret:
paymentSheet.paymentIntentClientSecret,
),
);
await Stripe.instance.presentPaymentSheet();Use the returned values with flutter_stripe to initialize and present the native payment sheet.
RevenueCat
For RevenueCat products, the purchase itself is handled by the RevenueCat SDK.
After the purchase is completed, refresh the Revenipe customer state. Revenipe then reads the latest provider state and returns the updated access and entitlement data.
Step 11: Check access
After a purchase, trial, or provider-side state change is completed, refresh the customer session and check access through entitlements.
Examplefinal hasAccess = Revenipe.instance.hasEntitlement('support_access');Use entitlement checks to decide whether a feature should be unlocked in your app. Your app should rely on Revenipe access state, not only on the fact that a checkout or provider purchase flow was opened.
Important
Do not unlock access only because a checkout page, payment sheet, or provider
purchase screen was opened. Always unlock access based on the customer access state returned by Revenipe after the payment, trial, free plan, add-on, or provider state was confirmed.
Next steps
After completing the quickstart, continue with the Flutter SDK guide to learn how to install, configure, login customers, fetch products, start purchases, and check entitlements in more detail.